QuickBooks Tip: Are You Memorizing Transactions? Should You Be?
03/22/2017
On December 22, 2017, The Tax Cuts and Jobs Act was signed into law. The information in this article predates the tax reform legislation and may not apply to tax returns starting in the 2018 tax year. You may wish to speak to your tax advisor about the latest tax law. This publication is provided for your convenience and does not constitute legal advice. This publication is protected by copyright.

You know that QuickBooks saves a lot of time. But have you explored how it does so by memorizing transactions?
Your accounting work involves a lot of repetition. You send invoices. Pay bills. Create purchase orders. Generate payroll checks and submit payroll taxes.
Some of the time, you only fill out those transaction forms once. You might be doing a one-time purchase, like paying for some new office furniture. Other times, though, you’re paying or charging the same companies or individuals on a regular basis.
QuickBooks contains a shortcut to those recurring tasks, called Memorized Transactions. You can save the details that remain the same every time, and use that template every time the bill or invoice is due, which can save a lot of time and improve accuracy. Here’s how it works.
Making Copies
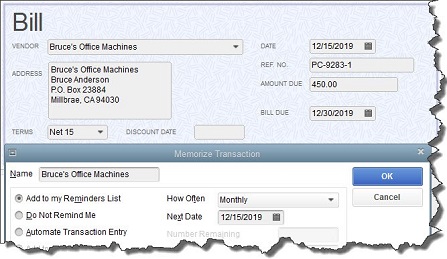
To memorize a transaction, you first need to create a model for it. Let’s say you have a monthly bill for $450 that’s paid to Bruce’s Office Machines. You’d click Enter Bills on the home page or open the Vendors menu and select Enter Bills. Fill in the blanks and select from drop-down lists to create the bill. Then click Memorize in the horizontal toolbar at the top of the form. This window will open.

Before you can Memorize a transaction, you first have to create a model (template) for it.
The vendor’s name will already be filled in on the Memorize Transaction screen. Look directly below that. There are three ways that QuickBooks can handle these Memorized Transactions when one of their due dates is approaching:
Add to my Reminders List. If you click the button in front of this option, the current transaction will appear on your Reminders List every time it’s due. You might request this for transactions that will change some every time they’re processed, like a utility bill that’s always expected on the same day, but which has a different amount every month. Do Not Remind Me. Obviously, QuickBooks will not post a reminder if you click this button. This is best used for transactions that don’t recur on a regular basis. Maybe you have a snow-shoveling service that you pay only when there’s a storm. So the date is always different, but everything else is the same. Automate Transaction Entry. Be very careful with this one. It’s reserved for transactions that are identical except for the issue date. They don’t need your approval – they’re just created and dispatched.
Click the down arrow in the field to the right of How Often and select the correct interval. Then click the calendar icon to pick a date for the next occurrence. If you have selected Automate Transaction Entry, the grayed-out lines below Next Date not shown here) contain fields for Number Remaining and Days in Advance to Enter.
How Does QuickBooks Know?
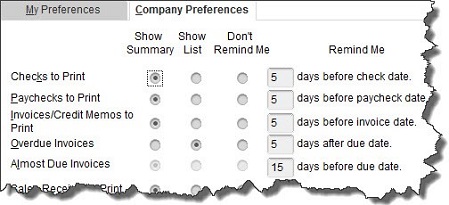
Obviously, you’ll want advance warning of transactions that will require processing. QuickBooks lets you specify how many days’ notice you want for each type. Open the Edit menu and select Preferences. Click Reminders in the left vertical pane, then the Company Preferences tab. You can tell QuickBooks whether you want to see a summary in each category or a list, or no Reminder. Then you can enter the number of days’ warning you want.

QuickBooks lets you specify the content and timing of your Reminders.
Working with Memorized Transactions
Once you’ve created some Memorized Transactions, you will undoubtedly need to review them at some point. QuickBooks makes this happen. Open the Lists menu and select Memorized Transaction List to see all the templates for recurring bills, invoices, etc., that you’ve defined. Right-click on one you want to work with, and this menu appears:

The Memorized Transaction List with the right-click window open
You have several options here. If your list is so long that it fills multiple screens, you can Find the transaction you’re looking for. If you’ve created multiple related transactions, you can save them as a New Group. You can also Edit, Delete, and Enter Memorized Transactions.
Anytime you’re letting QuickBooks do something on its own, it’s critical that you thoroughly understand the mechanics of setting the process up. We’d be happy to go over the whole topic of Memorized Transactions with you, or any other aspect of QuickBooks operations.
2017 Archives
LINDSTROM ACCOUNTANCY CORP.
2291 W March Lane Ste D105, Stockton CA 95207
(209) 451-0428 FAX (209) 451-0593
© web design by one eleven stockton, ca
