QuickBooks Tip - Working with Downloaded Transactions in QuickBooks Online
11/23/2017
On December 22, 2017, The Tax Cuts and Jobs Act was signed into law. The information in this article predates the tax reform legislation and may not apply to tax returns starting in the 2018 tax year. You may wish to speak to your tax advisor about the latest tax law. This publication is provided for your convenience and does not constitute legal advice. This publication is protected by copyright.

Downloading transactions into QBO is the easy part. You still have work to do once they’re on board.
Its ability to download financial transactions is one of the five best things about QuickBooks Online. Without it, you’d spend a lot of time on tedious data entry, verifying which checks and deposits had cleared and entering new ones.
Instead, you can easily connect to your bank and bring in all your activity from the previous hours or day. QuickBooks Online stores this neatly in a register and provides tools for you to further describe and classify each transaction.
Setting Up the Connection
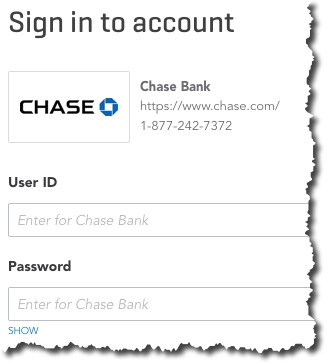
Haven’t connected your financial institution to QuickBooks Online yet? It’s easy. Click the Banking link in the toolbar, then Add Account in the upper right. The Find your bank window opens. Start entering the name of your bank, credit card company, or service like PayPal in the blank field. A list of potential matches will drop down; you simply select the one you want. A window like this will open:

All you need to do to start downloading transactions into QuickBooks Online is select your financial institution and enter the User ID and Password you use to connect directly to the site.
You will have to go through some security procedures, and then QuickBooks Online will download 90 days of transactions (you can shorten this if you’d like). You’ll also be asked which QBO account should receive the transactions. After a few minutes, the register for that account will appear, displaying the transactions you just downloaded.
Warning: The mechanics of connecting to your bank and downloading your first batch of transactions may sound easy, but if everything is not absolutely clear to you as you’re going through the process, please contact us sooner rather than later.
Working with Transactions
Once you’ve downloaded a set of transactions, you’ll want to look at them. Again, click the Banking link in the navigation toolbar. Your accounts will appear in small boxes at the top of the page, along with two balances: the one that came from the financial institution and the one in QuickBooks Online. Select the one you want by clicking on it, and its register will open.
Tip: QuickBooks Online generally updates your accounts once daily. If you want to launch a manual update at any time, click on Update in the upper right corner.
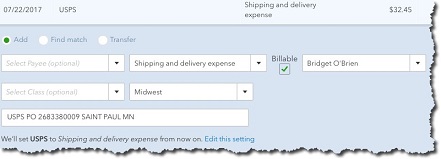
Let’s look at one downloaded transaction to see what you can do with it. Make sure the For Review column is highlighted above the register. Select a transaction by clicking on it. A window like this will open below it:

QuickBooks Online does more than simply download financial transactions: It lets you define them in greater detail.
There are several options here, including:
Add to register. If you’re satisfied with the information as is, just click the Add button to the right (not pictured here).
Split. If you want to split the amount/category (Supplies, Tools, etc.)/class of a transaction, click Split (also off to the right and not pictured). A window will open to let you specify that.
Assign categories. QuickBooks Online may automatically make assignments to obvious categories, which you can change if incorrect. You can also click the down arrow to the right of that field and select your own from the list.
Bill an expense to a customer. Did you purchase something that needs to be billed to a customer? Click in the box under Billable and select the correct one from the drop-down list that opens.
Find matches. This can get complicated, and we recommend you let us work with you on it. Let’s say you entered an invoice in QuickBooks Online, and an income item for that exact amount gets downloaded from your bank. QBO will assume that those two “match,” and display them in the In QuickBooks column. You can click Undo if this is incorrect. But you can also click Find match in the transaction window, and QBO will open a list of possibilities.
As you can see from browsing the lists of downloaded transactions, there’s a lot to learn here. We’d be happy to get together and walk you through your first explorations of these powerful features.
2017 Archives
LINDSTROM ACCOUNTANCY CORP.
2291 W March Lane Ste D105, Stockton CA 95207
(209) 451-0428 FAX (209) 451-0593
© web design by one eleven stockton, ca
